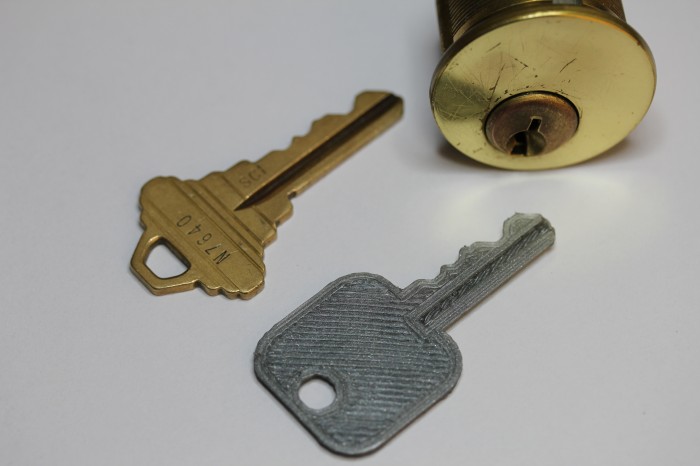
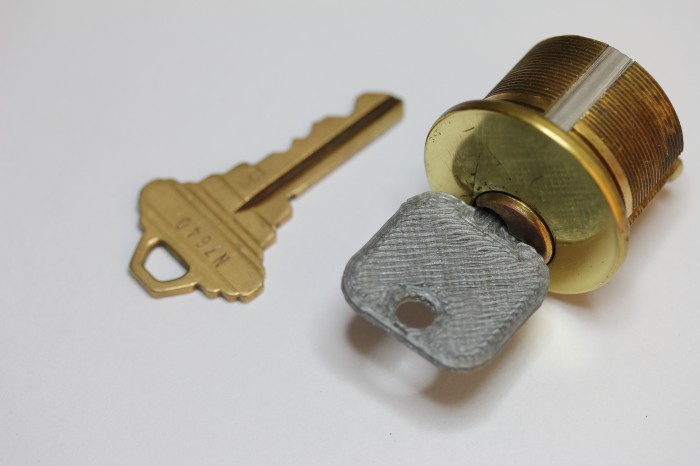
It occurred to me recently that I had printed almost nothing actually useful on my RepRap 3D printer, aside from parts to improve on or build more RepRaps. I am rectifying that with this project. The goal here is to generate working house keys by inputing the key code of the lock into a parametric OpenSCAD model. Instead of having to explain to my landlord how I ended up with a wedge of plastic jammed in my front door, I ordered a box of (well) used locks and latches from eBay to experiment on. Luckily, the lot includes both Kwikset KW1 and Schlage SC1 locks, which are the two most commonly found in the US. I created an SC1 model to start with, but I’ll probably make a KW1 soon. I’ve uploaded the KW1 model now as well.
Designing the key model was actually pretty straightforward. I measured a key with a ruler and calipers and created an approximate model of it that is reasonably easy to print. I then got pin depth specifications and parametrically differenced them out of the model. To generate new keys, you can just edit the last line of the file and enter in the key code for your key. If the code isn’t written on the key, you can measure the height of each bit and compare to the numbers in the Root Depth column on the aforementioned pin depth site. Perhaps more nefariously, you could implement something like SNEAKEY to generate key codes without physically measuring the key.
You’ll of course need OpenSCAD to edit the .scad file and generate an STL to print out, unless your key just happens to be 33172 like the example STL posted below. If it is, you can unlock the doorknob currently sitting on my desk. As a small, precise object, this is a great test of how accurate your Skeinforge settings are. You may need to adjust some thicknesses or the built in pin depth fudge factor to get it working properly with your printer. The pictures above show the key being used on a disconnected lock cylinder, but I found it was also strong enough to turn a deadbolt. If your lock needs a lot of force to turn, you may need to cut a space into the key to use a torsion wrench with it.
Download:
sc1.scad
sc1.stl
kw1.scad
kw1.stl


Wow! This is a really neat use of OpenSCAD. I’ll have to see if I can dig up an old lock and key to try it on this week.
I am very impressed. My only concern would be durability. This would probably be great if u lost a key i suppose, especially because u could make one then take it to be copied to a brass/zinc blank.
I just don’t like the idea of sticking plastic into a lock cylinder, not when i’ve broken so many normal keys lol.
great idea though!
With a plastic key you can make a mold…
Molds of keys have minor issues, we’ve tried at fablocker (an organization of 3d printer enthusiasts and lockpicks – this kind of thing is right up our alley!)
I think our biggest issue was that we didn’t want to use high melting temperature metals – if you were doing something like lost wax casting it might work well… but RTV and field’s metal, don’t try it lol
http://www.oscar-diaz.net/?p=773
A year ago now… the same project, but also re-designing the key.
Very cool. Though that appears to have been a design show of a concept (a very nice one), printed on a high-end 3d printer. This is a working key printed by a MakerBot, which is an impressive feat.
Hey Nirav, I recently made an iPhone application to copy keys by taking a photo. http://www.dittokey.com . We should probably talk 🙂
While printing “pre-cut” keys is cool, being able to duplicate the blank+keyway is a nicer trick. Why? Copying common keys isn’t too hard with hand tools, and it only costs $2 or less at most hardware stores. But getting high security blanks can be a challenge and makes research+experimentation a little more challenging. An Easy Entrie key blank duplicator is nice but costs about $10k. Being able to print key blanks is pretty cool, thanks for posting your work. I have a decent collection of high security locks and keys, now if only I had time to make STL’s of them all..
So cool,
you could 3D print them in stainless steel on http://www.shapeways.com
or even silver, but that may fail in some expensive silver grinding action.
Great work
There’s an undeniable “Ubergeek Cred” about printing a key at all, let alone from non-contact methods. And, in theory, one might stripmine old photos etc for keydata too.
This is an excellent project to show what these fab ‘bots can do in making real world, almost daily use objects. My suggestion is to contemplate embedding Metal and Kevlar fiber elements in the printed key. Metal for pure torque transfer, Kevlar as “Graceful Failure Mode” enhancement. So even if a key breaks, the Kevlar “should” allow a clean removal of the failed bits. Too many of us fondly recall the money we made from “Color-Lite” aluminums :>
it only has to be strong enough to resist to metal guide on a key copying machind
How about trying this on abloy protec locks for a laugh? 😛
That’s exactly what this is building to: http://eclecti.cc/hardware/physical-keygen-now-for-disc-detainer-locks
Great project!
I wish I had a 3D printer, but I can’t afford one right now.
One little mistake you made: Anyone can print a key to your house and get in and rob you. You might have to replace your locks.
oh really? he bought a bunch of locks on fleabay to experiment on. Next time your try to read more ok?
Over at the 3D Printing Village at the 2011 NYC Maker Faire, I built a random key with sc1.scad and we printed it out on a Makerbot Cupcake, then took the key over to Toool folks at the Lockpick Village. There, I found a training lock with one pin installed and (randomly) the printed key worked perfectly;
http://yfrog.com/z/kk7exryj
http://yfrog.com/z/mo1ufoj (my hand but not my card – it’s the head of our Hackerspace in Ohio)
The members of the sport-lockpicking community I’ve shared this with are very excited about the prospects of printable keys. Thanks for some fun SCAD scripts!
http://www.slate.com/blogs/future_tense/2012/07/16/_3_d_printed_handcuff_keys_hacker_highlights_security_problem_for_police.html
If you add render() above the first difference() in both the bit() and sc1() modules, then you can render the key by just compiling it, as opposed to having to compile and render. (I only checked the sc1 scad file since that’s the type of key I have)
we’re waiting… where’s the stl’s for the kw1 and sc1 bump keys?
curious – what 3d res (100 micron?) and material (PLA?)did you use?
Could you please publish a modified version of this code for an SC4 Schlage Key?
Just wanted to say thank you for your work. Over a decade later, locked out but with access to a 3D printer and knowledge of my 5 digit Schlage code, this really saved the day. Appreciate the clear writeup and key file that worked first try. We live in the future!