Parametric M.2 Mockup Generator

The thing I’m sharing today is a very early and very small slice of the project that is likely going to consume the next few years of my life. This is a parametric generator for M.2 expansion card mockups in OpenSCAD.

I can’t imagine this is useful to many people, but the beauty of open source software and hardware is that it doesn’t have to be. Even if only one person happens upon this years down the road and it saves them a few hours or gives them the reference point they needed, it was worth sharing. Sharing knowledge isn’t zero-sum; it’s exponential (though maybe not in this specific instance).

// M.2 Mockup Generator
// by Nirav Patel <https://eclecti.cc>
//
// To the extent possible under law, Nirav Patel has waived all copyright
// and related or neighboring rights to M.2 Mockup Generator.
//
// An easy to use parametric M.2 mockup generator.
// See https://en.wikipedia.org/wiki/M.2 for more information about the 
// M.2 (formerly NGFF) standard.

edge_width = 19.85;
edge_length = 4;
edge_r = 0.5;
hole_r = 1.75;
key_r = 0.6;
key_length = 3.5;

pcb_thick = 0.8;
bottom_edge_keepout = 5.2;
top_gnd_pad_r = 2.75;
bottom_gnd_pad_r = 3;
bottom_gnd_pad_offset = 1;
bevel = 0.3;
bevel_angle = 20;

$fn=50;

module key_cutout() {
    union() {
        translate([0, key_length - key_r]) circle(r = key_r);
        translate([-key_r, -1]) square([key_r*2,key_length - key_r +1]);
    }
}

function get_key(key_type="mm") =
    key_table[search([key_type],key_table,1,0)[0]][1];

key_table = [["", 100], ["A", 6.625], ["B", 5.625], ["C", 4.625], ["D", 3.625], ["E", 2.625], ["F", 1.625], ["G", -1.125], ["H", -2.125], ["J", -3.125], ["K", -4.125], ["L", -5.125], ["M", -6.125]];

module m2_2d(width=22, length=30, key="M", key2="") {
    // Start with a 2d version
    difference() {
        square([width, length]);
        
        // Left cutout
        translate([(width-edge_width)/2-width, -edge_r]) square([width, edge_length]);
        translate([(width-edge_width)/2-width-edge_r, 0]) square([width, edge_length]);
        translate([(width-edge_width)/2-edge_r, edge_length-edge_r]) circle(r=edge_r);
        
        // Right cutout
        translate([width-(width-edge_width)/2, -edge_r]) square([width, edge_length]);
        translate([width-(width-edge_width)/2+edge_r, 0]) square([width, edge_length]);
        translate([width-(width-edge_width)/2+edge_r, edge_length-edge_r]) circle(r=edge_r);
        
        // Hole cutout
        translate([width/2, length]) circle(r = hole_r);
        
        // Key cutouts
        translate([width/2 + get_key(key), 0])
            key_cutout();
        
        translate([width/2 + get_key(key2), 0])
            key_cutout();
    }
}

module m2_text(width=22, length=30, height="", key="", key2="") {
    if (key2 != "") {
        string = str(width, length, "-", height, "-", key, "-", key2);
        linear_extrude(height = 1)
            text(string, size = 2.5);
    } else {
        string = str(width, length, "-", height, "-", key);
        linear_extrude(height = 1)
            text(string, size = 2.5);
    }
}

module m2(width=22, length=30, height="", key="", key2="") {
    union() {
        difference() {
            linear_extrude(height = pcb_thick)
                m2_2d(width, length, key, key2);
            
            // The card edge bevel
            translate([0, bevel, 0]) rotate([180-bevel_angle, 0, 0]) cube([width, 10, 10]);
            translate([0, bevel, pcb_thick]) rotate([90+bevel_angle, 0, 0]) cube([width, 10, 10]);
        }
        
        difference() {
            // The various component keepout zones and embossed text
            if (height == "S1") {
                difference() {
                    translate([0, edge_length, pcb_thick]) cube([width, length-edge_length, 1.2]);
                    translate([1, edge_length+1, pcb_thick+1.2-0.5]) m2_text(width, length, height, key, key2);
                }
            } else if (height == "S2") {
                difference() {
                    translate([0, edge_length, pcb_thick]) cube([width, length-edge_length, 1.35]);
                    translate([1, edge_length+1, pcb_thick+1.35-0.5]) m2_text(width, length, height, key, key2);
                }
            } else if (height == "S3") {
                difference() {
                    translate([0, edge_length, pcb_thick]) cube([width, length-edge_length, 1.5]);
                    translate([1, edge_length+1, pcb_thick+1.5-0.5]) m2_text(width, length, height, key, key2);
                }
            } else if (height == "D1") {
                difference() {
                    translate([0, edge_length, pcb_thick]) cube([width, length-edge_length, 1.2]);
                    translate([1, edge_length+1, pcb_thick+1.2-0.5]) m2_text(width, length, height, key, key2);
                }
                translate([0, bottom_edge_keepout, -1.35]) cube([width, length-bottom_edge_keepout, 1.35]);
            } else if (height == "D2") {
                difference() {
                    translate([0, edge_length, pcb_thick]) cube([width, length-edge_length, 1.35]);
                    translate([1, edge_length+1, pcb_thick+1.35-0.5]) m2_text(width, length, height, key, key2);
                }
                translate([0, bottom_edge_keepout, -1.35]) cube([width, length-bottom_edge_keepout, 1.35]);
            } else if (height == "D3") {
                difference() {
                    translate([0, edge_length, pcb_thick]) cube([width, length-edge_length, 1.5]);
                    translate([1, edge_length+1, pcb_thick+1.5-0.5]) m2_text(width, length, height, key, key2);
                }
                translate([0, bottom_edge_keepout, -1.35]) cube([width, length-bottom_edge_keepout, 1.35]);
            } else if (height == "D4") {
                difference() {
                    translate([0, edge_length, pcb_thick]) cube([width, length-edge_length, 1.5]);
                    translate([1, edge_length+1, pcb_thick+1.5-0.5]) m2_text(width, length, height, key, key2);
                }
                translate([0, bottom_edge_keepout, -0.7]) cube([width, length-bottom_edge_keepout, 0.7]);
            } else if (height == "D5") {
                difference() {
                    translate([0, edge_length, pcb_thick]) cube([width, length-edge_length, 1.5]);
                    translate([1, edge_length+1, pcb_thick+1.5-0.5]) m2_text(width, length, height, key, key2);
                }
                translate([0, bottom_edge_keepout, -1.5]) cube([width, length-bottom_edge_keepout, 1.5]);
            } else {
                translate([1, edge_length+1, pcb_thick-0.5]) m2_text(width, length, height, key, key2);
            }
            
            // The ground pad keepouts
            translate([width/2, length, pcb_thick]) cylinder(r = top_gnd_pad_r, h = 10);
            translate([width/2, length-bottom_gnd_pad_offset, -10]) {
                cylinder(r = bottom_gnd_pad_r, h = 10);
                translate([-bottom_gnd_pad_r, 0, 0]) cube([bottom_gnd_pad_r*2, bottom_gnd_pad_offset, 10]);
            }
        }
    }
}

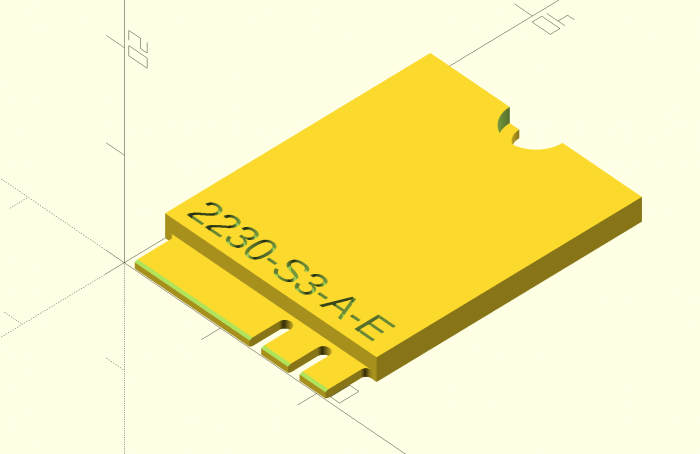
m2(width=22, length=30, height="S3", key="A", key2="E");

This is also up on GitHub as a Gist.

1 Comment on Parametric M.2 Mockup Generator

Physical Keygen: Now for Disc Detainer Locks

ABUS Plus Disc Lock

The Physical Keygen post got reactions, but there was a common claim among many of them that it was just a gimmick because there are more practical ways of getting past basic Schlage and Kwikset pin tumbler locks.  I agree with that, and I’ll also admit that a fair number of my projects are gimmicks, or as a stretch, art.  Schuyler Towne of Open Locksport saw past the gimmick (or art) and into the possibility of printing keys for more interesting locks.

He stopped by recently with a collection of said locks, and over the period of a few hours we determined that keys for disc detainer locks were printable and created a nearly working ABUS Plus key.  He left me a cutaway lock, and over the next week, I refined the model to the point of working straight off of the printer.  Despite being a higher security lock than the SC1 or KW1 pin tumblers I was working with before, the key is much easier to print accurately.  The OpenSCAD model is linked below, and like the last files, you simply edit the last line to match the code for your key.

The ABUS Plus and other disc detainer locks are much more common in Europe than the US, but we do have a pretty ubiquitous example around here.  After the Bic Pen debacle in 2004, Kryptonite switched their bicycle U-locks from tubular to disc detainer.  I designed a model off of the key from the Kryptonite Evolution I have, but as of yet, I have not successfully opened the lock with it.  The key is smaller and thinner than the ABUS Plus, causing it to flex too much to effectively turn the last few discs.  I’ve posted the file anyway, in case someone has stronger plastic or an idea to strengthen the model.

Edit: The Kryptonite key works. I tightened my X and Y belts and printed it a bit slower. Apparently some of the blobbing on the corners before was catching on disks.

Download:
abus_plus.scad
kryptonite.scad

2 Comments on Physical Keygen: Now for Disc Detainer Locks

Physical Keygen: Duplicating House Keys on a 3D Printer

3D Printed House Key

It occurred to me recently that I had printed almost nothing actually useful on my RepRap 3D printer, aside from parts to improve on or build more RepRaps.  I am rectifying that with this project.  The goal here is to generate working house keys by inputing the key code of the lock into a parametric OpenSCAD model.  Instead of having to explain to my landlord how I ended up with a wedge of plastic jammed in my front door, I ordered a box of (well) used locks and latches from eBay to experiment on.  Luckily, the lot includes both Kwikset KW1 and Schlage SC1 locks, which are the two most commonly found in the US.  I created an SC1 model to start with, but I’ll probably make a KW1 soon.  I’ve uploaded the KW1 model now as well.

Key in Lock

Designing the key model was actually pretty straightforward.  I measured a key with a ruler and calipers and created an approximate model of it that is reasonably easy to print.  I then got pin depth specifications and parametrically differenced them out of the model.  To generate new keys, you can just edit the last line of the file and enter in the key code for your key.  If the code isn’t written on the key, you can measure the height of each bit and compare to the numbers in the Root Depth column on the aforementioned pin depth site.  Perhaps more nefariously, you could implement something like SNEAKEY to generate key codes without physically measuring the key.

You’ll of course need OpenSCAD to edit the .scad file and generate an STL to print out, unless your key just happens to be 33172 like the example STL posted below.  If it is, you can unlock the doorknob currently sitting on my desk.  As a small, precise object, this is a great test of how accurate your Skeinforge settings are.  You may need to adjust some thicknesses or the built in pin depth fudge factor to get it working properly with your printer.  The pictures above show the key being used on a disconnected lock cylinder, but I found it was also strong enough to turn a deadbolt.  If your lock needs a lot of force to turn, you may need to cut a space into the key to use a torsion wrench with it.

Download:
sc1.scad
sc1.stl
kw1.scad
kw1.stl

52 Comments on Physical Keygen: Duplicating House Keys on a 3D Printer

FaceCube: Copy Real Life with a Kinect and 3D Printer

Thumbs Up

This project is a tangent off of something cool I’ve been hacking on in small pieces over the last few months.  I probably would not have gone down this tangent had it not been for the recent publication of Fabricate Yourself.  Nothing irks inspires me more than when someone does something cool and then releases only a description and pictures of it.  Thus, I’ve written FaceCube, my own open source take on automatic creation of solid models of real life objects using the libfreenect python wrapper, pygame, NumPy, MeshLab, and OpenSCAD.

The process is currently multi-step, but I hope to have it down to one button press in the future.  First, run facecube.py, which brings up a psychedelic preview image showing the closest 10 cm of stuff to the Kinect.  Use the up and down arrow keys to adjust that distance threshold.  Pressing spacebar toggles pausing capture to make it easier to pick objects.  Click on an object in the preview to segment it out.  Everything else will disappear; clicking elsewhere will clear the choice.  You can still use the arrow keys while it is paused and segmented to adjust the depth of what you want to capture.  You can also use the H and G keys to adjust hole filling to smooth out noise and fill small holes in the object.  If the object is intended to have holes in it, press D to enable donut mode, which leaves the holes open.  Once you are satisfied, you can press P to take a screenshot or S to save the object as a PLY format point cloud.

FaceCubeSegmentedPoint Cloud

You can then open the PLY file in MeshLab to turn it into a solid STL.  I followed a guide to figure out how to do that and created a filter script attached below.  To use it, click Filters -> Show current filter script, click Open Script, choose meshing.mlx, and click Apply Script.  You may have to click in the preview, but after a few seconds, it will say that it Successfully created a mesh.  You can click Render -> Render Mode -> Flat Lines to see what it looks like.  You can then click File -> Save As, and save it as an STL.  You can probably get better results if you manually pick the right filters for your object, but this script will be enough most of the time.

MeshLabOpenSCADRepsnapper

You can then open the STL in OpenSCAD or Blender and scale it and modify to your heart’s (or printer’s) content.  Of course, the real magic comes from when you take advantage of all that OpenSCAD has to offer.  Make a copy of yourself frozen in carbonite, put your face on a gear, or make paper weights shaped like your foot.  This is also where the name FaceCube comes from.  My original goal going into this, I think at my roommate’s suggestion, was to create ice cube trays in the shapes of people’s faces.  This can be done very easily in OpenSCAD, involving just subtracting the face object from a cube.

difference() {
	cube([33,47,17]);
	scale([0.15,0.15,0.15]) translate([85,140,120]) rotate([180,0,0]) import_stl("face.stl");
}

FaceCube Tray

Since all of the cool kids are apparently doing it, I’ve put this stuff into a GitHub repository.  Go ahead and check it out, err… git clone it out.  The facecube.py script requires the libfreenect from the unstable branch and any recent version of pygame, numpy, and scipy.  You’ll need any recent version of MeshLab or Blender after that to do the meshing.  I’ve been using this on Ubuntu 10.10, but it should work without much trouble on Windows or OS X.  The latest code will be on git, but if you are averse to it for whatever reason, I’ve attached the script and the meshlab filter script below.  Since Thingiverse is the place for this sort of thing, I’ve also posted it along with some sample objects as thing:6839.

Download:
git clone git@github.com:nrpatel/FaceCube.git

facecube.py
meshing.mlx

13 Comments on FaceCube: Copy Real Life with a Kinect and 3D Printer