What “Hardware is Hard” Really Means

I was chatting with a new hardware entrepreneur recently who asked an excellent question: What does “Hardware is hard” really mean?  It being time consuming and expensive to iterate on, not being able to ship patches, requiring specialized skillsets, and having access to a smaller pool of investors are all reasons commonly mentioned.  These all relate, but at its core, what makes hardware hard is that you don’t get second chances.

Pick the wrong audience target, go to market strategy, feature set, pricing, production forecast, manufacturing methodology, manufacturing partners, or logistics partners, and you will run out of money.  Worse, you can get all but one of those things right and still never make it off the ground.  Startups require setting a bold hypothesis and then charting a narrow course to proving it.  In many software and service businesses, you can set short milestones to test and iterate with target audiences closed-loop, course correcting rapidly to find product market fit with a small team before scaling.  If you have a strong team and you’re picking good hypotheses, you’ll have a reasonable chance to get enough funding to keep going at it for some time.

With hardware, each of those is orders of magnitude more challenging.  Iteration cycles are expensive, partner and technology selections can take you through one way doors you can’t afford to walk back from, and building inventory of the wrong product or for the wrong audience is fatal.  Perhaps most critically, if you run out of money, you are unlikely to get funding to pivot, no matter how strong your team is.

All of that said, hardware is essential to civilization and a whole lot of fun to make.  Nobody needs another Web3 NFT marketplace.  Build something that matters.  Here’s what you can do to minimize your likelihood of death along the way:

  1. Be extremely deliberate about your audience sequencing.  Think about the first 1k, the first 10k, the first 100k, and the first 1M customers.  Don’t start your company with a product or go to market strategy for the first 1M customers unless you are certain that it is what will also satisfy the first 1k.  It takes brand awareness, company credibility, and ultimately the right product to fit your audiences’ needs to reach each subsequent level of scale.  There are ways to streamline this that will depend on your product and category.  For example, starting with an openly available development kit works well for products that will eventually have a hardware or software ecosystem attached to them (something we did successfully at Oculus).
  2. Deeply understand how your audiences behave today, what they are buying, and why what you are building would be enough better to make them change their behavior.  Think through the purchase cycle.  Does this need to be a replacement, a first product, a second product, or a toy to tinker with?  I don’t generally subscribe to product/management fads, but Jobs-to-be-done has a useful framing for audience psychology with the “four forces” diagram.
  3. Build the right team and pick the right partners.  Many hardware startups try to emulate Apple’s product and design philosophy and then replicate the staffing model that requires.  Don’t.  Start with the smallest possible team for what you need to differentiate on in design and engineering along with the core set of people needed to safely steer supply chain and logistics.  Leverage partners for everything else.  You can always in-house more in the future as you scale, but don’t make the mistake of building substantial capital infrastructure or hiring team members that you don’t need to to reach product market fit.  You can solve this with a competent manufacturing partner that has expertise or at least transferable skills and infrastructure for your space. You can work with them in a “Joint Development Model”.  The people you’ll work with there will be carrying in an enormous amount of collective experience and team cohesion, won’t need equity, can move fast, and will generally require less OpEx than hiring the equivalent capability in house.
  4. Think carefully about funding and runway.  Unless you can afford to self-fund your company to profitability, make sure you’re actively having discussions with potential investors as you plan, whether angels or institutional VCs.  Lay out your hypotheses around product roadmap and audience scaling and the funding milestones that go with them.  Critically, make sure plausible investors agree that those are sensible milestones, otherwise you’ll end up at one without the cash to go further.
  5. Find ways to get the first 1k or 10k customers to help fund the business.  Never use equity to fund inventory.  Think carefully about how you can generate enough credibility to get 1k or 10k people to put money down on a product that hasn’t been manufactured yet.  That is most often in the form of pre-orders.  Credibility generation may be through seeding development units to influential users or press in the space, though a limited developer kit program, through a community beta program, or other creative paths.  If you can’t get 1k customers to take the bet and spend money on your product, investors probably shouldn’t place a bet on you either.

This is by no means a comprehensive list of tactics, but a condensed set of viewpoints around a topic that could fill a book.  Note that all of the numbers above assume a consumer hardware product in a large category.  Feel free to scale the numbers appropriately for enterprise/commercial/niche hardware.  If you’re starting a hardware startup, especially in consumer, and you’d like feedback on how you’re approaching it, feel free to send me an email.  I applied each of the above to Framework, and would be happy to help check for startup-advice-fit on other companies.

2 Comments on What “Hardware is Hard” Really Means

Parametric M.2 Mockup Generator

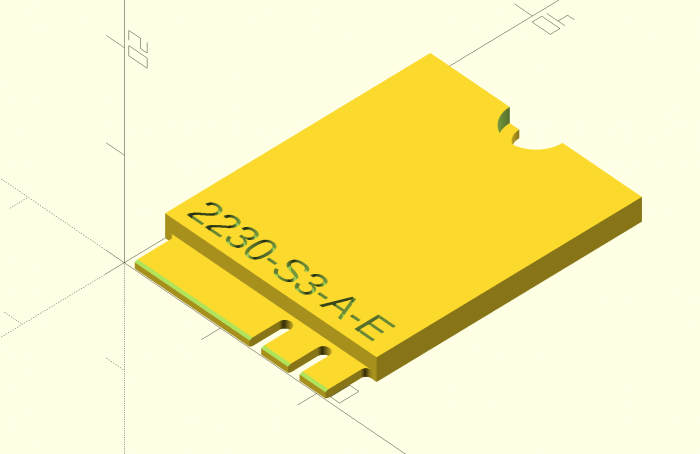
The thing I’m sharing today is a very early and very small slice of the project that is likely going to consume the next few years of my life. This is a parametric generator for M.2 expansion card mockups in OpenSCAD.

I can’t imagine this is useful to many people, but the beauty of open source software and hardware is that it doesn’t have to be. Even if only one person happens upon this years down the road and it saves them a few hours or gives them the reference point they needed, it was worth sharing. Sharing knowledge isn’t zero-sum; it’s exponential (though maybe not in this specific instance).

// M.2 Mockup Generator
// by Nirav Patel <https://eclecti.cc>
//
// To the extent possible under law, Nirav Patel has waived all copyright
// and related or neighboring rights to M.2 Mockup Generator.
//
// An easy to use parametric M.2 mockup generator.
// See https://en.wikipedia.org/wiki/M.2 for more information about the 
// M.2 (formerly NGFF) standard.

edge_width = 19.85;
edge_length = 4;
edge_r = 0.5;
hole_r = 1.75;
key_r = 0.6;
key_length = 3.5;

pcb_thick = 0.8;
bottom_edge_keepout = 5.2;
top_gnd_pad_r = 2.75;
bottom_gnd_pad_r = 3;
bottom_gnd_pad_offset = 1;
bevel = 0.3;
bevel_angle = 20;

$fn=50;

module key_cutout() {
    union() {
        translate([0, key_length - key_r]) circle(r = key_r);
        translate([-key_r, -1]) square([key_r*2,key_length - key_r +1]);
    }
}

function get_key(key_type="mm") =
    key_table[search([key_type],key_table,1,0)[0]][1];

key_table = [["", 100], ["A", 6.625], ["B", 5.625], ["C", 4.625], ["D", 3.625], ["E", 2.625], ["F", 1.625], ["G", -1.125], ["H", -2.125], ["J", -3.125], ["K", -4.125], ["L", -5.125], ["M", -6.125]];

module m2_2d(width=22, length=30, key="M", key2="") {
    // Start with a 2d version
    difference() {
        square([width, length]);
        
        // Left cutout
        translate([(width-edge_width)/2-width, -edge_r]) square([width, edge_length]);
        translate([(width-edge_width)/2-width-edge_r, 0]) square([width, edge_length]);
        translate([(width-edge_width)/2-edge_r, edge_length-edge_r]) circle(r=edge_r);
        
        // Right cutout
        translate([width-(width-edge_width)/2, -edge_r]) square([width, edge_length]);
        translate([width-(width-edge_width)/2+edge_r, 0]) square([width, edge_length]);
        translate([width-(width-edge_width)/2+edge_r, edge_length-edge_r]) circle(r=edge_r);
        
        // Hole cutout
        translate([width/2, length]) circle(r = hole_r);
        
        // Key cutouts
        translate([width/2 + get_key(key), 0])
            key_cutout();
        
        translate([width/2 + get_key(key2), 0])
            key_cutout();
    }
}

module m2_text(width=22, length=30, height="", key="", key2="") {
    if (key2 != "") {
        string = str(width, length, "-", height, "-", key, "-", key2);
        linear_extrude(height = 1)
            text(string, size = 2.5);
    } else {
        string = str(width, length, "-", height, "-", key);
        linear_extrude(height = 1)
            text(string, size = 2.5);
    }
}

module m2(width=22, length=30, height="", key="", key2="") {
    union() {
        difference() {
            linear_extrude(height = pcb_thick)
                m2_2d(width, length, key, key2);
            
            // The card edge bevel
            translate([0, bevel, 0]) rotate([180-bevel_angle, 0, 0]) cube([width, 10, 10]);
            translate([0, bevel, pcb_thick]) rotate([90+bevel_angle, 0, 0]) cube([width, 10, 10]);
        }
        
        difference() {
            // The various component keepout zones and embossed text
            if (height == "S1") {
                difference() {
                    translate([0, edge_length, pcb_thick]) cube([width, length-edge_length, 1.2]);
                    translate([1, edge_length+1, pcb_thick+1.2-0.5]) m2_text(width, length, height, key, key2);
                }
            } else if (height == "S2") {
                difference() {
                    translate([0, edge_length, pcb_thick]) cube([width, length-edge_length, 1.35]);
                    translate([1, edge_length+1, pcb_thick+1.35-0.5]) m2_text(width, length, height, key, key2);
                }
            } else if (height == "S3") {
                difference() {
                    translate([0, edge_length, pcb_thick]) cube([width, length-edge_length, 1.5]);
                    translate([1, edge_length+1, pcb_thick+1.5-0.5]) m2_text(width, length, height, key, key2);
                }
            } else if (height == "D1") {
                difference() {
                    translate([0, edge_length, pcb_thick]) cube([width, length-edge_length, 1.2]);
                    translate([1, edge_length+1, pcb_thick+1.2-0.5]) m2_text(width, length, height, key, key2);
                }
                translate([0, bottom_edge_keepout, -1.35]) cube([width, length-bottom_edge_keepout, 1.35]);
            } else if (height == "D2") {
                difference() {
                    translate([0, edge_length, pcb_thick]) cube([width, length-edge_length, 1.35]);
                    translate([1, edge_length+1, pcb_thick+1.35-0.5]) m2_text(width, length, height, key, key2);
                }
                translate([0, bottom_edge_keepout, -1.35]) cube([width, length-bottom_edge_keepout, 1.35]);
            } else if (height == "D3") {
                difference() {
                    translate([0, edge_length, pcb_thick]) cube([width, length-edge_length, 1.5]);
                    translate([1, edge_length+1, pcb_thick+1.5-0.5]) m2_text(width, length, height, key, key2);
                }
                translate([0, bottom_edge_keepout, -1.35]) cube([width, length-bottom_edge_keepout, 1.35]);
            } else if (height == "D4") {
                difference() {
                    translate([0, edge_length, pcb_thick]) cube([width, length-edge_length, 1.5]);
                    translate([1, edge_length+1, pcb_thick+1.5-0.5]) m2_text(width, length, height, key, key2);
                }
                translate([0, bottom_edge_keepout, -0.7]) cube([width, length-bottom_edge_keepout, 0.7]);
            } else if (height == "D5") {
                difference() {
                    translate([0, edge_length, pcb_thick]) cube([width, length-edge_length, 1.5]);
                    translate([1, edge_length+1, pcb_thick+1.5-0.5]) m2_text(width, length, height, key, key2);
                }
                translate([0, bottom_edge_keepout, -1.5]) cube([width, length-bottom_edge_keepout, 1.5]);
            } else {
                translate([1, edge_length+1, pcb_thick-0.5]) m2_text(width, length, height, key, key2);
            }
            
            // The ground pad keepouts
            translate([width/2, length, pcb_thick]) cylinder(r = top_gnd_pad_r, h = 10);
            translate([width/2, length-bottom_gnd_pad_offset, -10]) {
                cylinder(r = bottom_gnd_pad_r, h = 10);
                translate([-bottom_gnd_pad_r, 0, 0]) cube([bottom_gnd_pad_r*2, bottom_gnd_pad_offset, 10]);
            }
        }
    }
}

m2(width=22, length=30, height="S3", key="A", key2="E");

This is also up on GitHub as a Gist.

No Comments on Parametric M.2 Mockup Generator

RepRap Controlled Time-Lapse Photography

While capturing the time-lapse last week, John and I ran into two irritating issues.  The first is that the moving platform causes the object being printed to come in and out of the focal plane of the camera and makes for a jarring video.  The second is that because the interval between photos is constant, some large and slow layers will have multiple shots taken while several consecutive quick layers can be skipped entirely.  The solution to both of these is to dynamically remote trigger the camera from the printer.

I wrote a Skeinforge photograph plugin that inserts a new G-code command, M240, which tells the printer to trigger a photograph.  The module offers three modes.  End of Layer, as demonstrated by Yoda above, is the simplest.  It takes one picture at the start of the first layer and then another at the end of each layer of the print, resolving only the second of the aforementioned issues.  Corner of Layer takes a picture at the minimum Y,X of each layer.  Least Change between Layers tries to take shots that are as close as possible to each other from layer to layer.  I had the most visually interesting results with the last setting, as shown in the Flower print up top.  The module can be downloaded from github, and installation instructions are included within its text.

Infrared Trigger

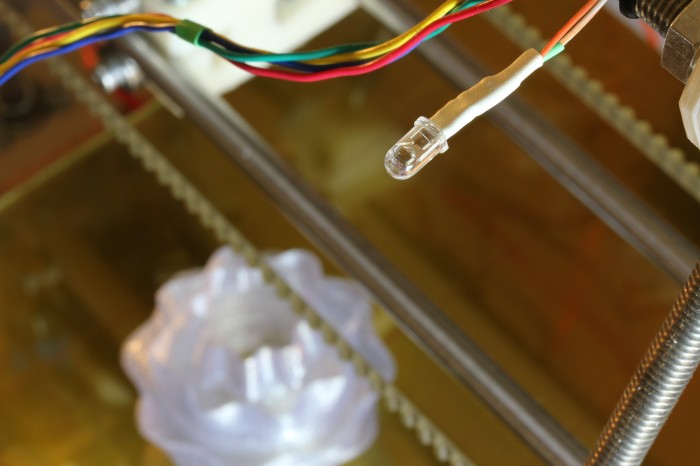
The other half of the control scheme is triggering the camera from the RepRap.  Since I didn’t want to risk coupling my T2i directly to the printer, I went for emulating a Canon RC-1 Remote, which has been thoroughly reverse engineered.  The hardware is simply an 850nm infrared LED in series with a 180 ohm resistor connected to one of the I/O pins on the Arduino Mega.  I chose pin 23 because I could solder to it without pulling my RAMPS board off.  The software side is equally simple.  For this, I forked the excellent Sprinter firmware to respond to M240 and send the correct pulse over the IR LED.  My fork is on github, but the diff that adds M240 support is the interesting bit.

2 Comments on RepRap Controlled Time-Lapse Photography

Time-Lapse of a RepRap Print

John visited recently and suggested that we bring another photographic production to the world: this time, a time-lapse of the RepRap printing out an interesting looking object.  After some frustrating attempts to install the Canon EOS Utility, we just used an intervalometer directly on my T2i with the Magic Lantern firmware.  In case you want to try it out and to save me a lot of Googling in the future, here are the mencoder parameters to generate a sanely sized video from high resolution stills.

mencoder -ovc lavc -lavcopts vcodec=mjpeg -mf fps=10:type=jpg -vf scale=960:720 'mf://*.JPG' -o timelapse.avi

Depending on which project gets swapped into my next free time slot, I may have another post soon exploring an extension on this that John and I discussed.

1 Comment on Time-Lapse of a RepRap Print

Speeding Up Skeinforge with PyPy

PyPy 1.5 vs CPython 2.6.6 for Skeinforge

Now that I’ve recovered from Maker Faire, I can continue documenting what I did.  In the lead up to the event, I tried to streamline the FaceCube project as much as possible so visitors wouldn’t have to waste precious Faire time waiting for a print to start.  On the hardware side, I kept the extruder and heated bed warmed up to operating temperature and (literally) hot swapped 4″x4″ pieces of glass so that prints could run back to back.  I updated the FaceCube script to do capture, cleaning, meshing, scaling, and running through OpenSCAD with a single button press.  The remaining bottleneck was running Skeinforge on my geriatric in computer years laptop.  Skeinforge is an amazing utility, but written in Python, it is slower than a drunk sloth.

There are ways of speeding up drunk sloths though.  Psyco is commonly recommended, but does not support 64 bit architectures.  My roommate Will came up with a plan to run a Skeinforge server on PyPy on a faster computer and have a client on my laptop send STLs to it for skeining.  We ran out of time on that, but we did get PyPy running normal Skeinforge on my laptop.  As of PyPy 1.5, there is support for Tkinter.  Following those instructions to install PyPy and Tkinter and run Skeinforge on 64 bit Linux:

wget https://bitbucket.org/pypy/pypy/downloads/pypy-1.5-linux64.tar.bz2
tar -xjvf pypy-1.5-linux64.tar.bz2
cd pypy-c-jit-43780-b590cf6de419-linux64
wget http://peak.telecommunity.com/dist/ez_setup.py
./bin/pypy ez_setup.py
./bin/easy_install tkinter-pypy
./bin/pypy ~/path_to_skeinforge/skeinforge.py

The fonts may look slightly different, but the application should behave the same.  Export times should decrease the first couple of times you put a file through as the JIT compiler optimizes and then stay good as long as you keep the process running.  On my laptop with a 2.00 GHz Core 2 Duo, Skeinforge runs 2 to 3 times faster on PyPy than on stock CPython 2.6.6. The tested objects were a Weighted Storage Cube, a Flower, Whistle v2, and the Prusa Mendel vertex.

1 Comment on Speeding Up Skeinforge with PyPy

A Pragmatic Workaround for Perpetual Copyright

To promote the Progress of Science and useful Arts, by securing for limited Times to Authors and Inventors the exclusive Right to their respective Writings and Discoveries.

Article I, Section 8, Clause 8, United States Constitution

One of the few Congressional powers specifically enumerated in the Constitution over two hundred years ago allows for the protection of intellectual property rights for a limited period of time.  Limited is, like much of the Constitution, intentionally vague.  In theory, depending on the whims of the judiciary in place, limited could be defined as anything up to the heat death of the universe.  Recent judgments put this within the realm of possibility.  I will not use this space as a discussion (rant) about copyright law or reform, mostly because there are much better and more interesting places to read about that.  I will, however, describe my experiences as a user of copyright and propose a workaround for some of its woes.

The Copyright Act of 1976, as confirmed in Kahle v. Gonzales, changed copyright from an opt-in system requiring registration to an opt-out system, in which any copyrightable work is automatically copyrighted upon publishing.  That means that without any intervention on my part, under current copyright law and assuming no further extensions, this blog post will enter the public domain April 25th, 2080 if I croak immediately after hitting the Publish button.  As my red meat intake has been limited recently and Congress is still in the pocket of big business, I expect the actual date will be much later.

Many rightly find this unreasonable, hence the rise of the copyleft and free culture movements.  Practically perpetual copyright isn’t so bad when the work is opened by a permissive license like Creative Commons Attribution or three clause BSD or a reciprocal license like the GPL.  Or is it?  If in 2134, a brain hacking hobbyist decides she wants to repurpose and distribute a Python game I wrote in 2009 as a retro eyesaver, should she really have to include the ISC license stating that my corpse disclaims all warranties including implied warranties of merchantability and fitness?  I argue that in a sane society, she should not, as the work would long have been in the public domain.  However, the license I attached to the work will remain valid for the entire absurd length of its copyright.

I propose a simple workaround for this problem: a self-destruct wrapper for licenses.  That is, a legal instrument by which the owner of a work can specify that he or she voluntarily and automatically relinquishes the work into the public domain after a specific number of years.  This is à la carte copyright, in which the creator may choose a length that seems sane, like the 14 years we started with in 1790.  This also has the effect of trumping any further extensions Congress may enact to keep Steamboat Willie in the vault, preventing a work I publish today from remaining under copyright in 3010.  One could use such a wrapper on any license, permissive, reciprocal, or restrictive.  An individual or company could profit from a work for a period of time of their choosing, and automatically grant it to the betterment of society at the self destruct date of the license.  A software developer can protect a piece of code from going proprietary with the GPL today without forever limiting projects that use it to a copyleft license.  I could protect myself from exploitation by marking a photograph I’ve taken as CC by-nc-nd for now without preventing its public use long after my death.

I can’t even pretend to be a lawyer, but here’s a proof of concept ripped from a piece of the Creative Commons Zero license.

/*
Upon the date of publication, the License shall be deemed effective.  Upon
X years from the date of publication, the Waiver shall be deemed effective.
 
Waiver:
To the greatest extent permitted by, but not in contravention of, applicable
law, Affirmer hereby overtly, fully, permanently, irrevocably and
unconditionally waives, abandons, and surrenders all of Affirmer's Copyright
and Related Rights and associated claims and causes of action, whether now
known or unknown (including existing as well as future claims and causes of
action), in the Work (i) in all territories worldwide, (ii) for the maximum
duration provided by applicable law or treaty (including future time
extensions), (iii) in any current or future medium and for any number of
copies, and (iv) for any purpose whatsoever, including without limitation
commercial, advertising or promotional purposes (the "Waiver"). Affirmer makes
the Waiver for the benefit of each member of the public at large and to the
detriment of Affirmer's heirs and successors, fully intending that such Waiver
shall not be subject to revocation, rescission, cancellation, termination, or
any other legal or equitable action to disrupt the quiet enjoyment of the Work
by the public as contemplated by Affirmer's express Statement of Purpose.
 
License:
...
*/

Since I am not a lawyer, I have no idea if a self-destructing license is legally possible.  I would like to get lawyerly advice on the idea before I start attaching it to my projects, but this is certainly something I plan on using.  Hopefully it appeals to others too.  Since the bug fix for perpetual copyright isn’t coming any time soon, this workaround will have to do.

No Comments on A Pragmatic Workaround for Perpetual Copyright