
Reverse Engineering the Lytro .LFP File Format

Lytro Microlens Array

After getting my Lytro camera yesterday, I set about answering the questions about the light field capture format I had from the last time around.  Lytro may be focusing (pun absolutely intended) on the Facebook using crowd with their camera and software, but their file format suggests they don’t mind nerds like us poking around.  The file structure is the same as what they use for their compressed web display .lfp files, complete with a plain text table of contents, so I was able to re-use the lfpsplitter tool I wrote earlier with some minor modifications.  The README with the tool describes in detail the format of the file and how to parse it.

The table of contents in the raw .lfp files gives away most of the camera’s secrets.  It contains a bunch of useful metadata and calibration data like the focal length, sensor temperature, exposure length, and zoom length.  It also gives away the fact that the camera contains a 3 axis accelerometer, storing the orientation of the camera with respect to gravity in each image.   The physical sensor is 3280 by 3280 pixels, and the raw file just contains a BGGR Bayer array of it at 12 bits per pixel.  Saving the array and converting it to tif using the raw2tiff command below shows that each microlens is about 10 pixels in diameter with some vignetting on the edges.

raw2tiff -w 3280 -l 3280 -d short IMG_0004_imageRef0.raw output.tif

Syncing the camera to Lytro’s desktop software backs it up the first time.  Amazingly, the backup file uses the same structure as both .lfp file types.  The file contains a huge amount of factory calibration data like an array of hot or stuck pixels and color calibration under different lighting conditions.  Incredibly, it also lets loose that there is functioning Wi-Fi on board the camera with files named “C:\\CALIB\\WIFI_PING_RESULT.TXT” and “C:\\CALIB\\WIFI_MAC_ADDR.TXT”, which matches what the FCC teardowns show.  There is no mention of Bluetooth support though, despite support by the chipset.  In any case, it seems there is a lot of cool stuff coming via firmware updates.

Hopefully one of those updates enables a USB Mass Storage mode, as there does not appear to be any way to get files off of the camera in Linux. I had to borrow my roommate’s MacBook Air for this escapade. The camera shows up as a SCSI CD drive, but mounting /dev/sr0 only shows a placeholder message intended for Windows users.

Thank you for purchasing your Lytro camera.  Unfortunately, we do not have a
Windows version of our desktop application at this time.  Please check out
http://support.lytro.com for the latest info on Windows support.

It was pretty trivial to write the lfpsplitter to get the raw data shown above, but doing anything useful with it will take more effort.  Normally simple stuff like demosiacing the Bayer array will likely be complicated by the need to avoid the gaps between microlenses and not distort the ray direction information.  Getting high quality results will probably also require applying the calibration information from the camera backups.  A first party light field editing library would be wonderful, but Lytro probably has other priorities.

You can grab my lfpsplitter tool from GitHub at git://github.com/nrpatel/lfptools.git and I uploaded an example .lfp you can use with it if you want to play with light field captures without the $400 hardware commitment.

68 Comments on Reverse Engineering the Lytro .LFP File Format

Thoughts on the Lytro Light Field Camera

Lytro recently made its namesake light field camera available for preordering. The light field camera reaches closer to the plenoptic function than a standard camera in that instead of only summing the photons to arrive at chromacity and luminosity at each pixel, it additionally determines directional information. It does so by placing an array of microlenses above the sensor, each of which represents a light field pixel and covers a region of sensor pixels. Each sensor pixel then captures a ray arriving at a specific direction at its parent microlens. Ren Ng’s thesis is full of fascinating uses for this, but it seems Lytro is primarily focusing on the ability to refocus the light field image.

There is very little information available about the format the camera is capturing the light field in, but I suspect that it will not be impossible to use the files for other purposes like viewing parallax and perspective changes on a single capture. So far, the information we have is that the 8 gigabyte model can store 350 images, the sensor can capture 11 megarays, and the examples in the online gallery have resolutions of 831×831 to 1080×1080. Since the sensor in a light field camera captures one ray per pixel, we can assume the physical sensor is 11 megapixels. Conveniently, 350 11 megapixel images of 2 bytes per pixel add up to roughly 8 gigabytes. This suggests the format may be either a raw 16 bit Bayer array off of the sensor or a processed and packed RGB array. As for the microlens array, I suspect that it is a roughly 831×831 grid of hexagonal lenses, each of which cover a roughly 16 square pixel area, for a total sensor resolution of 3324×3324 pixels. We probably won’t know for sure until the cameras ship in early 2012.

In the meantime, we do have some sample images to play with, but not in the format captured by the camera. The Lytro desktop app apparently exports compressed representations of the light field to reduce file sizes and rendering requirements for web display. The .lfp files are simply a set of JPEGs representing the unique visually interesting sections of the light field. That is, a set in which each image shows a different area in focus. It appears to do so dynamically, picking the minimum number of images necessary to show all focusable objects in narrow depths of field. These images are stored along with their estimated depths and a depth lookup table for the image. This allows for HTML5 and Flash applications like the one embedded above in which the user clicks on a region of the image, the value of that region is looked up, and the depth image closest to that value is displayed.

To allow for viewing the files offline and to satisfy my curiosity, I wrote a tool called lfpsplitter that reads in an .lfp and writes out its component images as .jpg files and the depth lookup table and image metadata as plain text files. It is available on github, along with a README describing the file format in detail. Until we have Lytro cameras and .lfp files of our own to play with, you can find example files by examining the html source of Lytro’s gallery page.

Update: Given the animated parallax shift image of Walt Mossberg on the Lytro blog, it seems that each microlens covers an area 5 pixels across horizontally. Perhaps the sensor is 4096×4096 and 11 megarays describes the number of pixels getting useful photons, or the microlenses are arranged in a honeycomb pattern with a maximum width of 5px.

2 Comments on Thoughts on the Lytro Light Field Camera

RepRap Controlled Time-Lapse Photography

While capturing the time-lapse last week, John and I ran into two irritating issues.  The first is that the moving platform causes the object being printed to come in and out of the focal plane of the camera and makes for a jarring video.  The second is that because the interval between photos is constant, some large and slow layers will have multiple shots taken while several consecutive quick layers can be skipped entirely.  The solution to both of these is to dynamically remote trigger the camera from the printer.

I wrote a Skeinforge photograph plugin that inserts a new G-code command, M240, which tells the printer to trigger a photograph.  The module offers three modes.  End of Layer, as demonstrated by Yoda above, is the simplest.  It takes one picture at the start of the first layer and then another at the end of each layer of the print, resolving only the second of the aforementioned issues.  Corner of Layer takes a picture at the minimum Y,X of each layer.  Least Change between Layers tries to take shots that are as close as possible to each other from layer to layer.  I had the most visually interesting results with the last setting, as shown in the Flower print up top.  The module can be downloaded from github, and installation instructions are included within its text.

Infrared Trigger

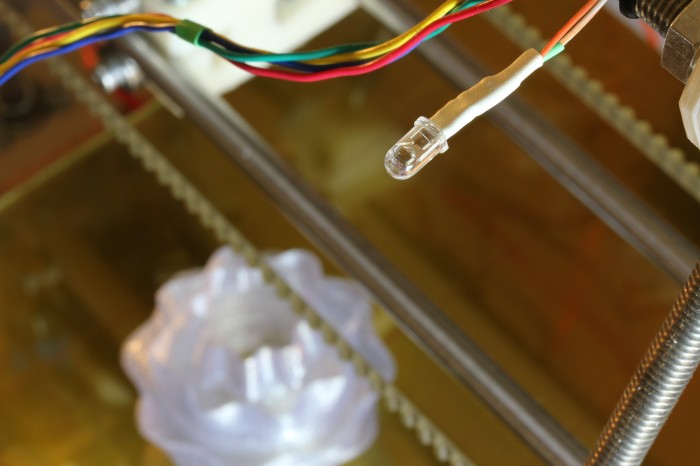
The other half of the control scheme is triggering the camera from the RepRap.  Since I didn’t want to risk coupling my T2i directly to the printer, I went for emulating a Canon RC-1 Remote, which has been thoroughly reverse engineered.  The hardware is simply an 850nm infrared LED in series with a 180 ohm resistor connected to one of the I/O pins on the Arduino Mega.  I chose pin 23 because I could solder to it without pulling my RAMPS board off.  The software side is equally simple.  For this, I forked the excellent Sprinter firmware to respond to M240 and send the correct pulse over the IR LED.  My fork is on github, but the diff that adds M240 support is the interesting bit.

2 Comments on RepRap Controlled Time-Lapse Photography

Time-Lapse of a RepRap Print

John visited recently and suggested that we bring another photographic production to the world: this time, a time-lapse of the RepRap printing out an interesting looking object.  After some frustrating attempts to install the Canon EOS Utility, we just used an intervalometer directly on my T2i with the Magic Lantern firmware.  In case you want to try it out and to save me a lot of Googling in the future, here are the mencoder parameters to generate a sanely sized video from high resolution stills.

mencoder -ovc lavc -lavcopts vcodec=mjpeg -mf fps=10:type=jpg -vf scale=960:720 'mf://*.JPG' -o timelapse.avi

Depending on which project gets swapped into my next free time slot, I may have another post soon exploring an extension on this that John and I discussed.

1 Comment on Time-Lapse of a RepRap Print

Star Wars Uncut: Scene 437 in Stop Motion Photography

This is what happens (best case) when geeks have too much free time.  My friend John Martin and I decided to take part in Star Wars Uncut, an experiment to recreate Star Wars: A New Hope in a series of several hundred 15 second chunks, each created by random people across the internet.  I chose a scene with a pleasant blend of dialog and pyrotechnics.

John has an inordinate quantity of Star Wars merchandise, so we went with stop motion animation for the scene, something neither of us was familiar with.  We found the actual action figures for almost every part of the 15 seconds, and really only had to improvise on the explosions, as we would rather not blow up collectibles.

With assistance from Peter Martin and Meg Blake, we fabricated Y-wings out of soda bottles, cardboard tubes, cardboard, and spray paint.  We filled each with a mixture of half potassium nitrate and half sugar, lit it with a fuse, and dragged it with a string as we took pictures.  As you can see by the video above, the results are reasonable for an afternoon of filming and a $0 budget.

5 Comments on Star Wars Uncut: Scene 437 in Stop Motion Photography