The Quick Version:
I wrote a few scripts to test the possibility of using pixel perfect collision detection in pygame to allow for interactions between real life and on screen objects. They require the installation of my branch of pygame, which includes support for v4l2 cameras. The download links for the scripts (including OLPC versions) and pygame source are at the bottom of the post.
The Verbose and Occasionally Tangential Version:
Joel Stanley of OLPC sent me a patch for my GSoC project a few days ago, along with a link to a picture of an exhibit at The Tech Museum of Innovation in San Jose, in which a person can manipulate virtual falling sand with his or her shadow. That is exactly the kind of killer tech demo I’ve been looking for for my project. The kind of thing that anyone could pick up in an instant and realize the beauty of human computer interaction. Of course, the museum setup had a controlled environment, a projector, a screen, and probably a whole lot of processing power. I have hundreds of thousands of kids around the world on 433mhz laptops.
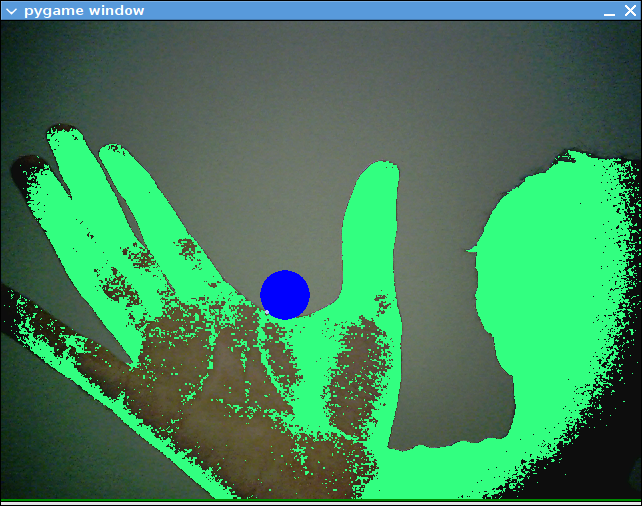
At first, in response to Joel’s email, I had just planned to describe how to get the equivalent of the shadow. It obviously could not require a projector, a screen, a uniformly colored background (green screen), or even a consistant source of light to project a shadow. Instead, this requires an initial calibration step. When the scripts start, they wait for the user to hit a button. The user should then get out of view of the camera, so it only sees the background. It then waits a couple seconds and takes a picture of the background. The shadow is then created by thresholding frames currently being captured against the original background image. This actually works pretty well as long as the background isn’t moving. So, play it with the camera facing a wall if possible.
I had planned to just leave it at that, but then I figured since I already have that written, might as well just add a few lines of code to see if I could do pixel collisions between the shadow and objects on screen. Nothing complicated like sand, just a bubble on screen that the user pops. When this worked, I decided to extend it by having it place a new bubble on a random spot of the screen whenever one is popped. A few minutes later, my friend stopped by and asked what the hell I was doing jumping around in the middle of the room. I told her about the vision stuff, and then we both started jumping around in the middle of the room, popping fake bubbles. Who would have thought something that simple could be fun? That script is Pop Bubbles; you can download it at the bottom of the post and jump around your own room.
I thought I might be finished there, but it was still a far cry from the sand demo that Joel saw. I decided making the bubble move could be fun, so I added a fixed “velocity” of pixels that the bubble would move every frame if it wasn’t popped. It would be pretty silly if it kept going off the edge of the screen, so turned the edges into “walls” that would reverse the x or y velocity if the ball hit them. I then tried adding “gravity” by having the y velocity increase one step downward each frame, which turned the bubble into a ball. Then I added some inelasticity by decreasing the velocity a little upon impacting walls. Since the bubble was now pretty much a bouncy ball, I made it no longer pop upon hitting the shadow. Instead, it would bounce off the shadow in the opposite direction of where the shadow hit the ball, also adding some more velocity. By this point, I had a hideous doppelganger of physics that would make Newton wish he never saw an apple tree. This is what Bouncy Ball is, at the bottom of the post. Try it at your own risk. It is absurdly glitchy, and really only responds well to slow movements.
This still isn’t quite what the sand demo is, but I think it comes close enough to prove that it would be possible in Pygame. The biggest thing that is necessary is a real physics engine, which Zhang Fan is currently working on for Pygame as a GSoC project. Its likely that I will need to extend the bitmask module in pygame to make things like pinching an object possible. If anyone wants to improve this stuff, please do, there is a lot of room for it. I’d be happy to help out any way I can. I do hope to have something closer to the sand demo by the end of the summer.
As a note to OLPC users, I know its pretty inconvenient to have to build the library on the XO. I’m still working on packaging an .rpm and an .xo that contains all of my demo scripts. Also, for now, to get it running at a usable speed on the XO, it has to be at 320×240, which makes it pretty un-immersive, but I’m working on ways to scale it up without sacrificing much performance.
Download Python Scripts:
Bouncy Ball
Bouncy Ball (OLPC)
Pop Bubbles
Pop Bubbles (OLPC)
Download Pygame with camera module source:
Pygame 1.8.1 with camera module
Checkout Pygame with camera from git:
git clone git://git.n0r.org/git/pygame-nrp


